
What are HubSpot lists?
HubSpot lists allow you to group contacts based on their property values . This helps you better understand the volume of contacts that meet certain criteria , which is even more useful when used in conjunction with other HubSpot tools.
For example, you can use a list to schedule an email that is as personalized as possible, but you can also use them to define the criteria for a workflow or to segment your reports and see them more personalized.Do you like what you are reading?
What types of HubSpot lists are there?
We have two types of lists available in HubSpot, some are active lists and others are static. Now you will understand what each one consists of:
- Active lists. They are used automatically. As our contacts meet the predefined criteria, they become part of a list. You can use them in lead nurturing chain emails.
- Static lists. These are lists created instantly, that is, the set of contacts that meets the defined criteria enters the list, which is closed and, from that moment, cannot be expanded with the addition of additional contacts that meet the criteria later. Static lists could be used to send an email after an event.
How to create your own lists in HubSpot?
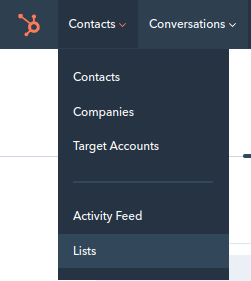
First, you need to go to “Contacts” and “Lists”, where you can see the lists that you have previously created.
In the upper right corner you will find the option to “Create a new list”. Clicking opens a window where you can choose whether you prefer the list to be active or static.
In this case, we are going to choose the active list. Then we click on the “next” button: it is time to define the criteria to apply.
On the left of the screen you can see examples of properties that you could apply to your HubSpot lists . We are going to select “contacts who have filled out a form”. By choosing this filter, you can continue customizing, for example, specifying if we are looking for a specific form to have been filled in or if any one works for us.
Once you have chosen the criteria, you have to click on “apply filter”. At this time it is important to give a name to the list created to be able to save it and make it easier for us to locate it later. In the upper left corner of the screen you will see a box that can be filled with the chosen denomination . In this case, we are going to put “Demo” and click on “Save”.
It would already be saved (although it must be borne in mind that it takes a few minutes to load the contacts). You can check if the list has been created correctly in HubSpot by entering the “Lists” section (it differs from others you have because its “size” is still 0).
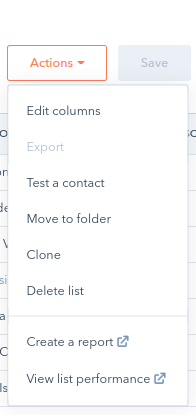
Once the list is created, you can carry out different actions by going to the “actions ” tab , in the upper right corner of the screen:
- Edit the columns (name, email, etc.): in this way, you eliminate the columns that do not interest you, change their order (dragging) and select the properties that would contribute the most to your analysis.
- Save them in a specific folder.
- Export the contacts.
- Clone it.
- Delete it.
- Create a report to see the performance.
When the necessary changes have been applied you have to press the “save” button so that they are saved.

As you can see, creating lists in HubSpot is a simple process. I hope this content has been useful to you and that you can take advantage of this platform functionality.
Would you like to ask me something about it? I read you in the comments!